User Guide of Magento 2 WhatsApp Chat Extension
General Configurations
At the backend, go to FME EXTENSIONS > Configurations. Here you can find the extension configurations.
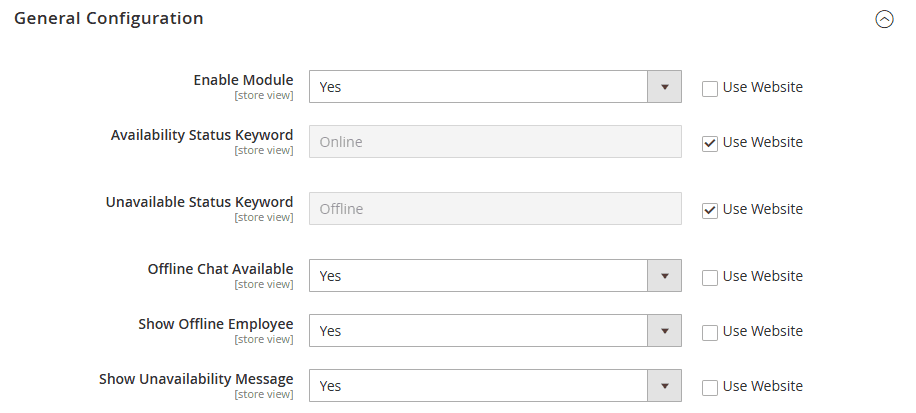
Under the General Configuration section, you can configure the following options.
- Enable Module: Select ‘Yes’ to enable the module
- Availability Status Keyword: Enter the word to display when the support agent is available
- Unavailable Status Keyword: Enter the word to display when the support agent is not available
- Offline Chat Available: Select ‘Yes’ to provide offline support
- Error Message: If you select ‘No’ in the above field, this field appears which allows you to enter the message to display if somebody tries to contact an offline support agent.
- Show Offline Employee: Select ‘Yes’ to show offline support agents.
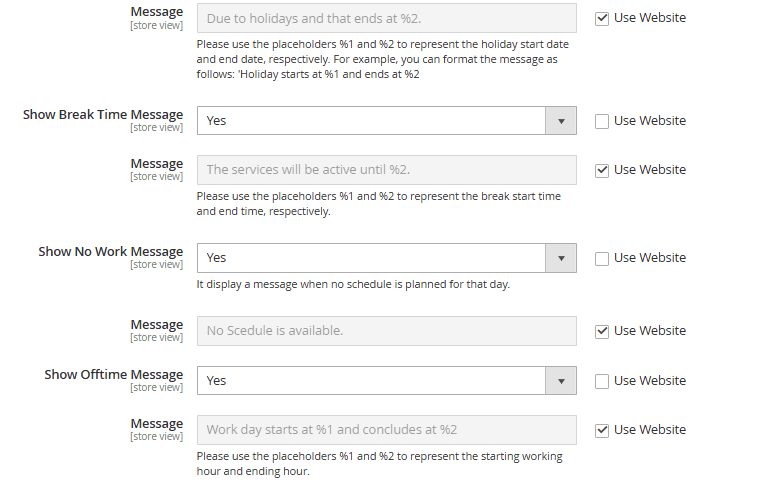
- Show Unavailability Message: If you select ‘Yes’ in the above field, the following 4 fields appear that allow you to enable a message why the agent is not available.
- Show Holiday Message:
- Show Breaktime Message:
- Show Weekend Message:
- Show Offtime Message:
Select ‘Yes’ in any of the above fields to get the ‘Message’ field enabled that allows you to enter a message to display as a reason for agent’s unavailability.
Font Settings
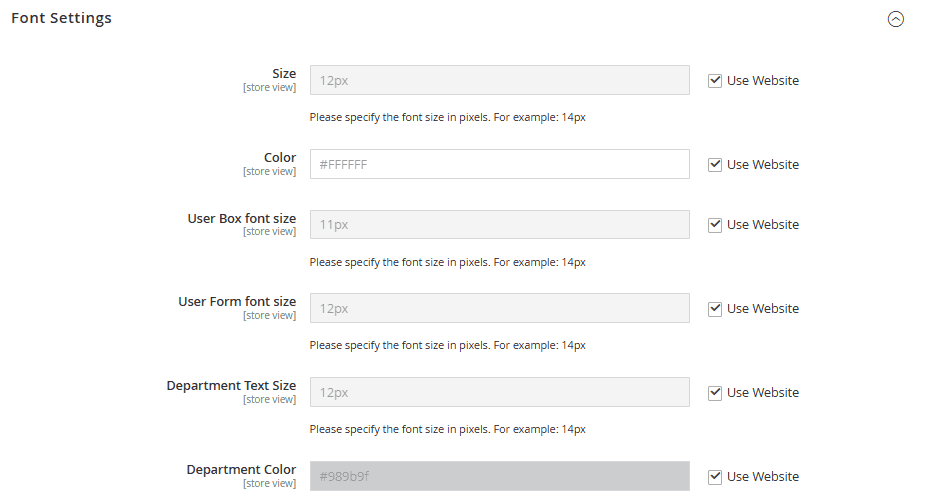
- Size: Specific the font size in pixels for the message in the user form that appears on clicking a specific agent.
- Color: Specific the color for the message in the user form that appears on clicking a specific agent.
- User Box font size: Specify the font size in pixels for the texts that appear on the user box.
- User Form font size: Specify the font size in pixels for the texts that appear on the user form.
- Department Text Size: Specify the text size in pixels for the department name on the WhatsApp popup.
- Department Color: Specify the text color for the department name on the WhatsApp popup.
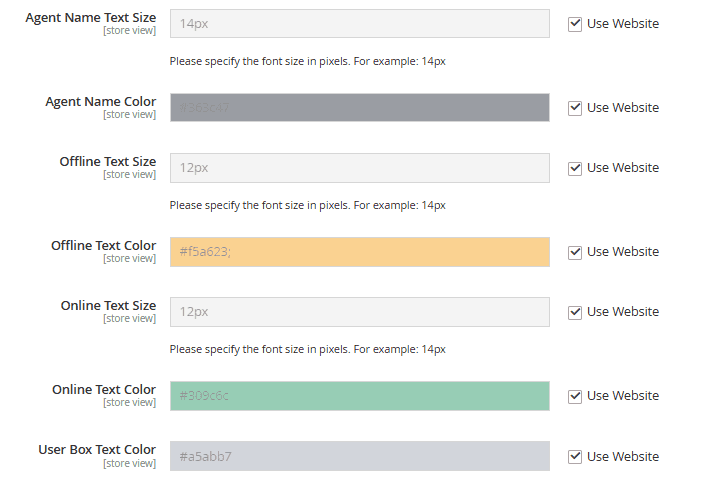
- Agent Name Text Size: Specify the text size in pixels for the agent name on the WhatsApp popup.
- Agent Name Color: Specify the text color for the agent name on the WhatsApp popup.
- Offline Text Size: Specify the text size in pixels for the offline status on the WhatsApp popup.
- Offline Text Color: Specify the text color for the offline status on the WhatsApp popup.
- Online Text Size: Specify the text size in pixels for the online status on the WhatsApp popup.
- Online Text Color: Specify the text color for the online status on the WhatsApp popup.
- User Box Text Color: Specify the color for the text on the user box.
- User Form Text Color: Specify the color for the text on the user form.
Popup Settings
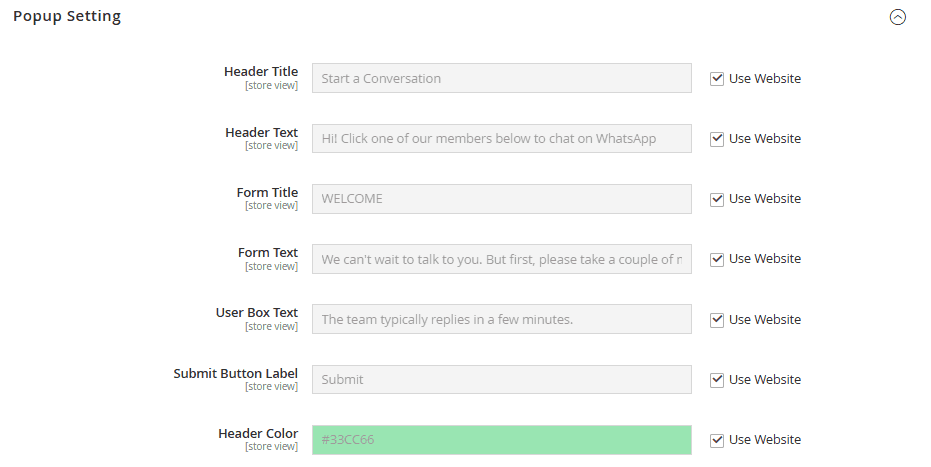
- Header Title: Enter a title to display in the WhatsApp popup heading.
- Header Text: Enter a description to display in the WhatsApp popup under the heading.
- Form Title: Enter a title to display on the user form that appears on clicking an agent.
- Form Text: Enter a description to display on the user form that appears on clicking an agent.
- User Box Text: Enter a text to display in the WhatsApp popup form.
- Submit Button Label: Enter a label for the submit button on the user form.
- Header Color: Specify a color for the WhatsApp user box header.
- Body Color: Specify the color for the body of the WhatsApp popup.
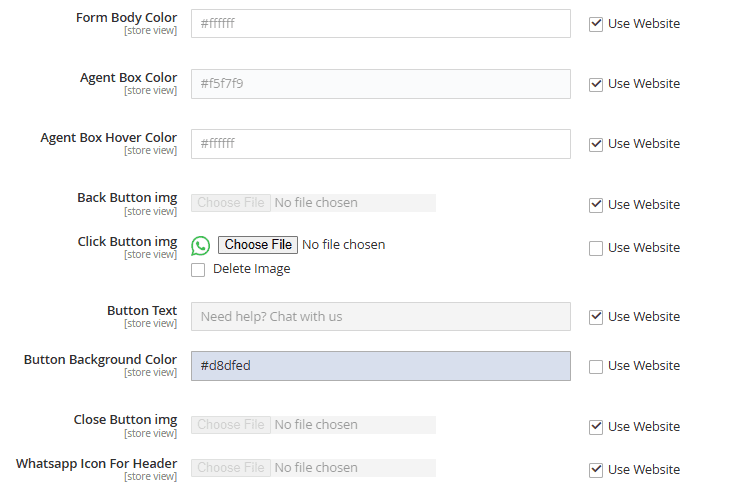
- Form Body Color: Specify the color for the body of the user form.
- Agent Box Color: Specify the color for the agent box.
- Agent Box Hover Color: Specify agent box hover color.
- Back Button img: Upload an image for the back button on the user form.
- Click Button img: Upload an image for the click button.
- Button Text: Specify the text for the button to expand the WhatsApp popup.
- Button Background Color: Specify the background color of the button to expand the WhatsApp popup.
- Close Button image: Upload an image for the close button.
WhatsApp Settings
- Message: Enter a message to be sent to the agent to start the WhatsApp conversation. %1 placeholder holds the value of the customer name while %2 holds the value of the relevant department.
- Active WhatsApp Icon: Upload an image for the active WhatsApp.
- Inactive Whatsapp Icon: Upload an image for the inactive WhatsApp.

Label Configurations
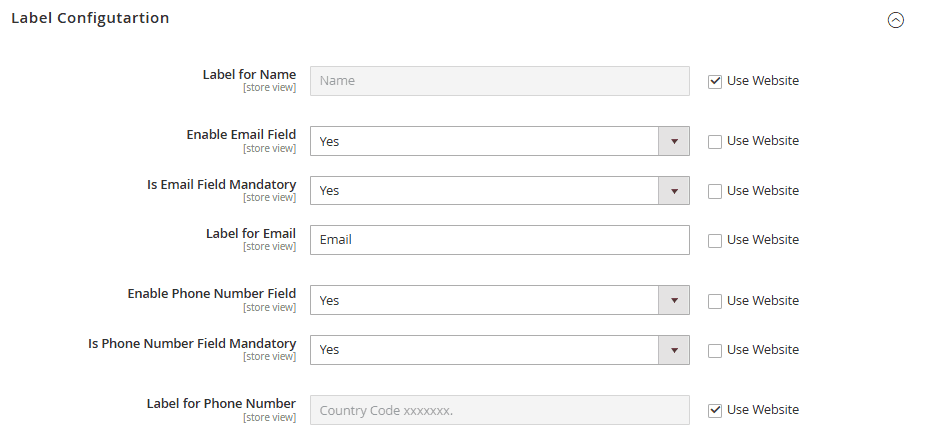
- Label for Name: Enter a label for the customer name field on the user form.
- Enable Email Field: Select ‘Yes’ to enable the email field on the user form.
- Is Email Field Mandatory: When you select ‘Yes’ in the above field, this field appears that allows you to make the email field mandatory or option.
- Label for Email: This field is also dependent on the Enable Email Field and allows you to enter a label for the field.
- Enable Phone Number Field: Select ‘Yes’ to enable the phone number field on the user form. If you select ‘Yes’, the ‘Is Phone Number Field Mandatory’ and ‘Label for Phone Number Field’ fields appear.
Weekly Schedule
This section allows you to set a weekly schedule for every department. The schedule defines an online and offline time for every agent in that department.
Login to your Magento 2 admin panel and navigate to FME EXTENSIONS > Weekly Schedule.
The schedule grid displays all the added schedules.

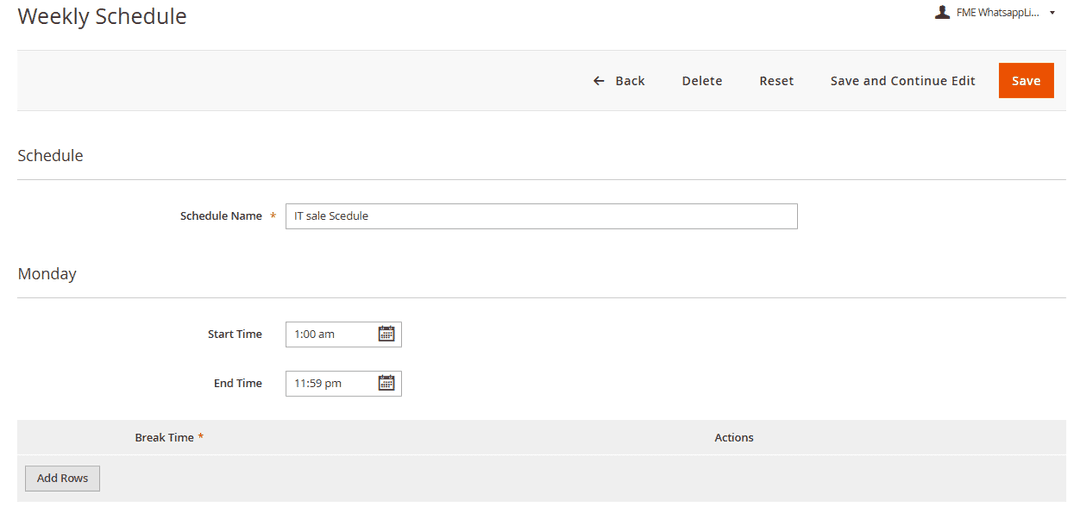
To add a new schedule, click on the Add New Schedule button.
- Schedule: Give the schedule a relevant name
- Start time: Set a start time for every day Monday-Friday.
- End Time: Set an end time for every day Monday-Friday.
- Break Time: Set a break schedule for every day Monday through Friday.
Holidays
This section allows you to add holidays. Agents will not be available on these days. Login to your Magento 2 admin panel and navigate to FME EXTENSIONS > Holidays. The holidays grid displays all the added holidays.

To add a new holiday, click on the Add holidays button.
- Holiday Name: Give the holiday a name
- Starting From: Set a starting date for the holiday
- Ending at: Set an ending date for the holiday

Special Days
This section allows you to add special days. These days are not usual working days but require agents to be available for special circumstances.
Login to your Magento 2 admin panel and navigate to FME EXTENSIONS > Special Days.
The special days grid displays all the added special days.

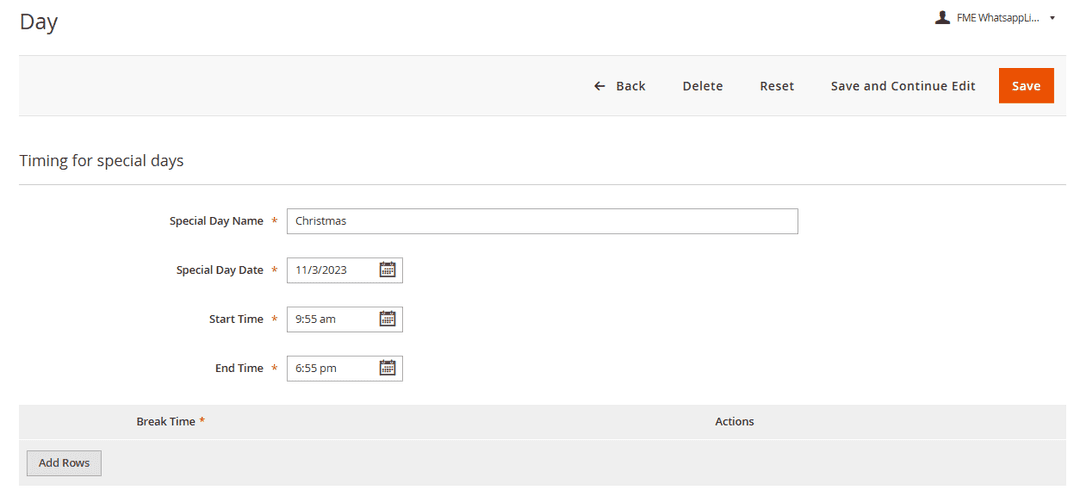
To add a new day, click on the Add Day button.
- Special Day Name: Give the special day a name
- Special Day Date: Specify the day date
- Start Time: Set a starting time for the special day
- End Time: Set an ending time for the special day
- Break Time: Set a break time during the day
Manage Agents
This section allows you to add new agents and edit/delete existing agents.
Login to your Magento 2 admin panel and navigate to FME EXTENSIONS > Manage Agent.
The agent grid displays all the added agents.
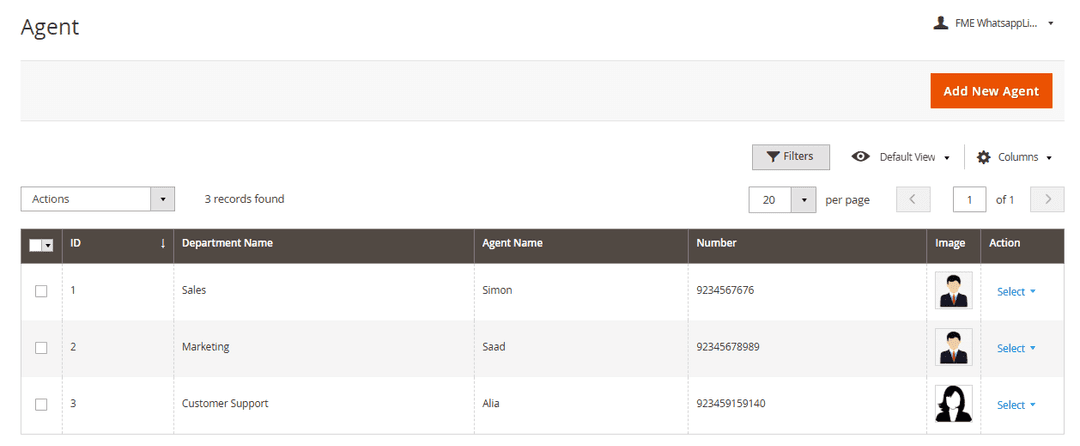
To add a new agent, click on the Add New Agent button.
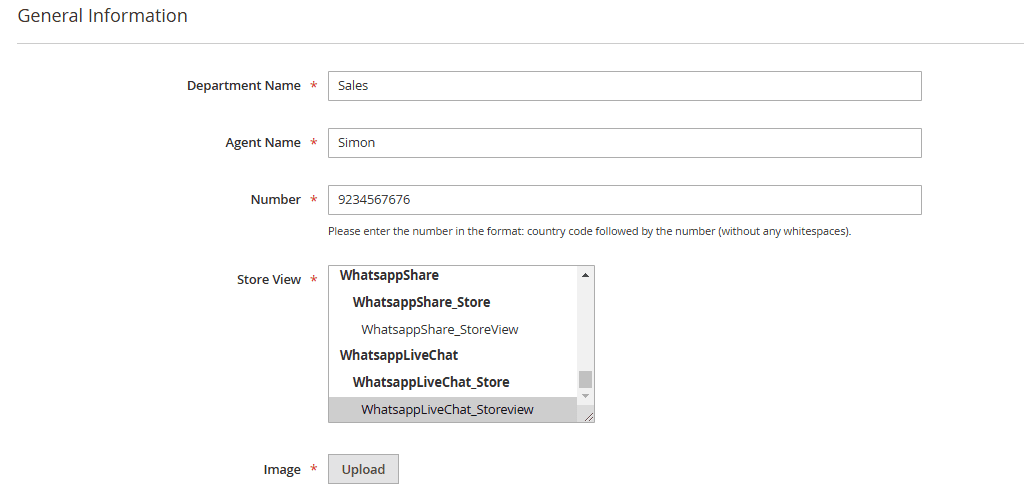
Under the ‘General Information’ section, configure the following options.
- Department Name: Enter the agent’s department
- Default message: Enter a default message to be sent to the customer
- Agent Name: Enter the agent’s name
- Number: Enter the agent’s WhatsApp number
- Store View: Select the relevant store view
- Image: Upload the agent’s picture
Under the ‘Schedule’ section, configure the following options.
- Extra Days: Select one or more special days that you have added for the agent. It means the agent will be available on these special days.
- Holidays: Select one or all holidays that you have added for the agent. It means the agent will be unavailable on these days.
- Time Schedule: Select a weekly schedule for the agent.
