
- About the Magento 2 File Upload Extension
- Magento 2 File Upload Programmatically in 2 Steps
- Magento 2 Upload Image Programmatically
- Final Thoughts on Magento 2 Product File Upload

If you are running an eCommerce store, then you’ll know that one of the most frequently performed actions is uploading files and product images. After all, you must upload multiple images and files to give users a detailed understanding about the product.
For instance, look at the below image.

Source: Amazon.com
As you can see on the left, the product has multiple images. Each image conveys different but essential information about the product. Therefore, we can conclude that success if eCommerce is dependent upon the quality and depth of images accompanying each product.
When it comes to Magento 2 file upload, it is straightforward process to upload files in Magento 2. You can either use our powerful Magento 2 Product Attachments extension to upload files of any type i.e. PDF, Docs, JPG, links, videos or embed a code within any custom module to upload file programmatically in Magento 2.
About the Magento 2 File Upload Extension
Check Out: Get Magento 2 Product Attachments extension
Why should you consider using this extension compared to upload file in Magento 2 programmatically? Firstly, the extension is easy-to-use, offering a highly interactive and user-friendly interface. Even if you are not an expert in Magento development, you can use the extension to upload pdfs, images, and other essential product information.
The extension also allows you to see the uploaded files in grid view.
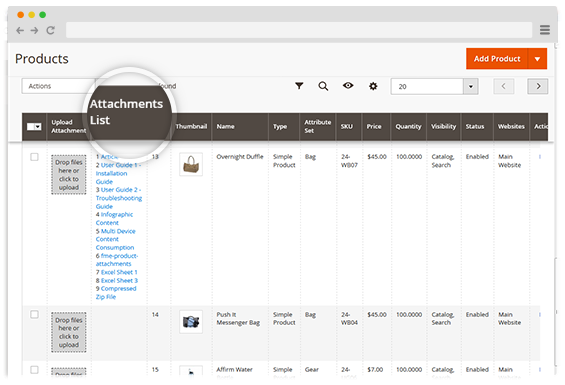
Source: FMEExtensions
It makes it easier to view attached files and saves time as you do not need to view each file separately. One of the highlights about this extension is that you can restrict the files by customer group. For instance, if you wish to show the files to select customers or those that are logged in, you can do it easily as seen below.
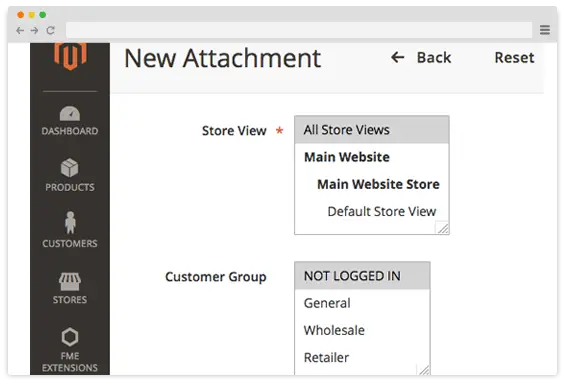
Source: FMEExtensions
This can be a great way to encourage users to sign up and buy frequently. If you are facing tough competition and wish to enhance the store’s competitiveness, this strategy can prove highly helpful. Create curiosity among the target market by providing them with selective information only.
In short, the extension is the best choice for Magento 2 product file upload and all other file types. But if you are not ready to use an extension, don’t worry since there is another way to upload a file in Magento 2. magento 2 file upload
Magento 2 File Upload Programmatically in 2 Steps
Magento 2 upload file programmatically involves 2 steps:
- Create a field to upload input file
- Controller to get request and save files
Here’s the HTML code for input file field.
input type="file" name="upload_custom_file" id="upload_custom_file" title="Upload Custom File" class="input-text" data-validate="{required:true}">
Here’s the controller class file code.
?php

namespace VendorName\ModuleName\Controller;

use Magento\Framework\App\Action\Context;

use Magento\Framework\Message\ManagerInterface;

use Magento\Framework\Filesystem;

use Magento\MediaStorage\Model\File\UploaderFactory;

class YourController extends \Magento\Framework\App\Action\Action

{

 protected $messageManager;

 protected $filesystem;

 protected $fileUploader;

 public function __construct(

 Context $context,

 ManagerInterface $messageManager,

 ...

 Filesystem $filesystem,

 UploaderFactory $fileUploader

 )

 {

 $this->messageManager = $messageManager;

 ...

 $this->filesystem = $filesystem;

 $this->fileUploader = $fileUploader;

 $this->mediaDirectory = $filesystem->getDirectoryWrite(\Magento\Framework\App\Filesystem\DirectoryList::MEDIA);

 parent::__construct($context);

 }

 public function execute()

 {

 // your code

 $uploadedFile = $this->uploadFile();

 // your code

 }

 public function uploadFile()

 {

 // this folder will be created inside "pub/media" folder

 $yourFolderName = 'your-custom-folder/';


 // "upload_custom_file" is the HTML input file name

 $yourInputFileName = 'upload_custom_file';

 try{

 $file = $this->getRequest()->getFiles($yourInputFileName);

 $fileName = ($file && array_key_exists('name', $file)) ? $file['name'] : null;


 if ($file && $fileName) {

 $target = $this->mediaDirectory->getAbsolutePath($yourFolderName);


 /** @var $uploader \Magento\MediaStorage\Model\File\Uploader */

 $uploader = $this->fileUploader->create(['fileId' => $yourInputFileName]);

 // set allowed file extensions

 $uploader->setAllowedExtensions(['jpg', 'pdf', 'doc', 'png', 'zip']);

 // allow folder creation

 $uploader->setAllowCreateFolders(true);

 // rename file name if already exists

 $uploader->setAllowRenameFiles(true);

 // upload file in the specified folder

 $result = $uploader->save($target);

 //echo ''; print_r($result); exit;

 if ($result['file']) {

 $this->messageManager->addSuccess(__('File has been successfully uploaded.'));

 }

 return $target . $uploader->getUploadedFileName();

 }

 } catch (\Exception $e) {

 $this->messageManager->addError($e->getMessage());

 }

 return false;

 }

}
Magento 2 Upload Image Programmatically
If you want to know about Magento 2 upload image programmatically, follow the below steps:
Step 1: Add the following to your .phtml file to create a form to Magento 2 upload image programatically:
form action="getUrl('modulename/controllername') ?>" method="post" enctype="multipart/form-data">

    input type="file" name="upload_custom_file" id="upload_custom_file" />

    button type="submit">Upload

/form>
Step 2: Create a controller for file upload in VendorName/ModuleName/Controller/ControllerName.php using:
namespace VendorName\ModuleName\Controller;

use Magento\Framework\App\Action\Context;

use Magento\Framework\Filesystem;

use Magento\MediaStorage\Model\File\UploaderFactory;

use Magento\Framework\App\Filesystem\DirectoryList;

class Upload extends \Magento\Framework\App\Action\Action

{

    protected $filesystem;

    protected $fileUploader;

    protected $mediaDirectory;

    public function __construct(

        Context $context,

        Filesystem $filesystem,

        UploaderFactory $fileUploader

    ) {

        $this->filesystem = $filesystem;

        $this->fileUploader = $fileUploader;

        $this->mediaDirectory = $filesystem->getDirectoryWrite(DirectoryList::MEDIA);


        parent::__construct($context);

    }

    public function execute()

    {

        $this->uploadImage();

    }

    public function uploadImage()

    {

        $folder = 'custom-images/';

        $inputName = 'upload_custom_file';

        try {

            $file = $this->getRequest()->getFiles($inputName);

            if ($file && isset($file['name'])) {

                $target = $this->mediaDirectory->getAbsolutePath($folder);

                $uploader = $this->fileUploader->create(['fileId' => $inputName]);

                $uploader->setAllowedExtensions(['jpg', 'jpeg', 'png', 'gif']);

                $uploader->setAllowCreateFolders(true);

                $uploader->setAllowRenameFiles(true);

                $result = $uploader->save($target);

                return $folder . $uploader->getUploadedFileName();

            }

        } catch (\Exception $e) {

            return false;
        }

        return false;

    }

}
Step 3: You can access the form using:
https://yourwebsite.com/modulename/controllername
Of course, this is just an example, and the actual URL will vary. Once you upload the image, you can access it in pub/media/custom-images/. This is everything there is to know about Magento 2 upload image programmatically.
Final Thoughts on Magento 2 Product File Upload
That’s everything there is to know about how to Magento 2 file upload programmatically. This is as straightforward as it seems. However, no question is a wrong question so don’t hesitate to contact us in case you have any questions regarding this article or anything Magento-related.
Other Articles You Might Be Interested In
This blog was created with FME's SEO-friendly blog