User Guide of Magento 2 Price Calculator
General Settings
At the back end, go to Stores > Configuration. Here you will find the following options.
- Enable in frontend: Select "Yes" to enable the module on the frontend, or "No" to disable it.

Basic Settings
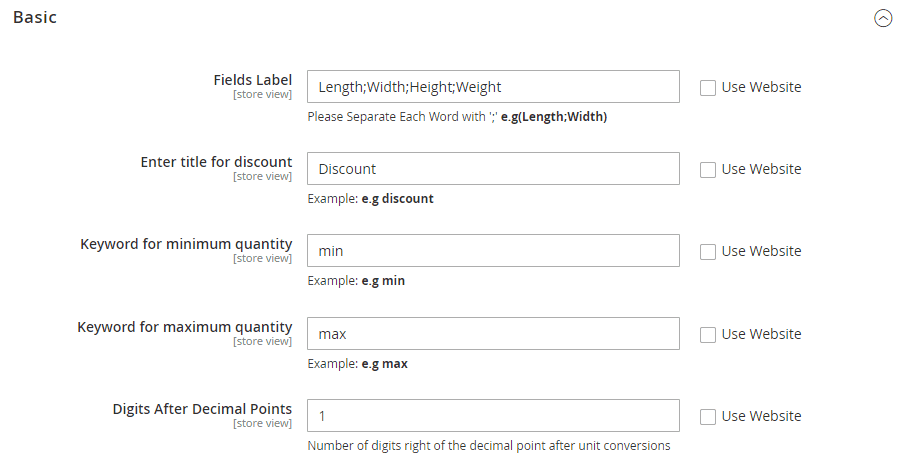
Under ‘Basic’, you will find the following options.
Fields Label: You can rename the fields as per your requirements. In the demo, we have named the fields as Length, Width, Height, Weight & Depth, etc. Please separate each word with ';' e.g. (Length; Width). These labels will be used when adding custom product options. See section 4.1.
Enter Title for Discount: Enter the title for the discount. You may change the title as per your requirement. We have kept it as a “discount” in the demo. This title will display on the product page.
Keyword for Minimum & Maximum Quantities: Enter keywords for min & max quantities. These keywords are used internally when specifying the min & max quantities for custom options. See section 4.2.
Digits After Decimal Point: pecify the number of digits you want to display after the decimal point.

Product Page Settings
Show Base Price: Option to hide or display the base price on the product page. Show Discount Price: Option to hide or display the discount price on the product page.

How To Add A Product Based On Pricing Rules?
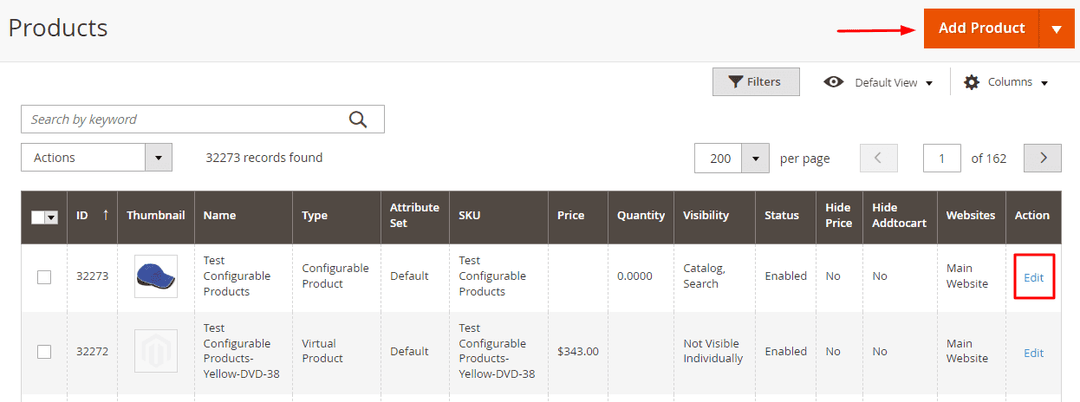
To add a new product based on different pricing rules, go to CATALOG > Products. Here you will find all the products in a grid. You can edit any product by clicking on the Edit button or click on the Add Product button to proceed.

Add Custom Options
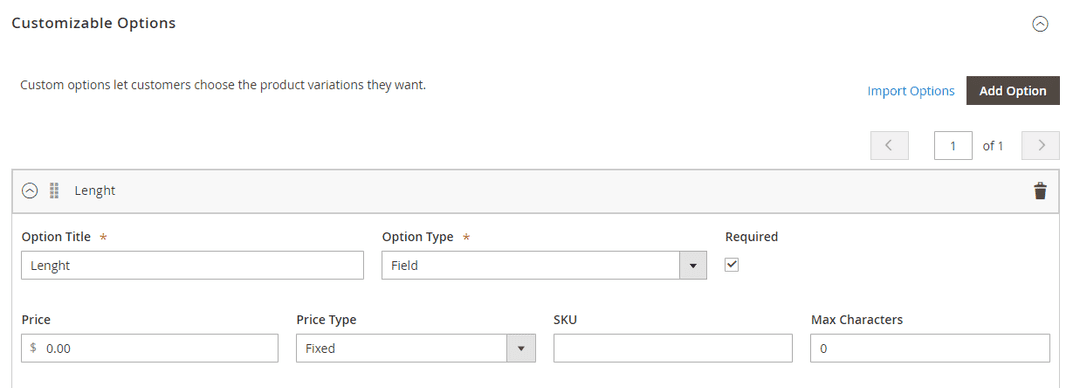
Fill in general information about the product. To ask customers to provide their measurement for the product, you need to add custom options. For example, if you want to calculate the price based on the product’s area, you can add options such as Length, and Width. To add custom options, scroll down to Customizable Options and click Add Options.
Remember the Option Title will only be valid if it has been declared in the Field’s Label in the configuration section. If they have not been declared, they will still be added but their values will not be calculated.
Note: If the output unit is different from the input unit, the extension will multiply the values of all the input measurements and convert the resulting number to the specified output unit. For example, if you want to display output in centimeters while customers will provide measurements in meters, the extension will take all the input values, multiply them, and convert the resulting value to centimeters.
Example: A customer specifies length as 2 meters, width as 4 meters, and height as 6 meters, the result in centimeters will be 4,800 i.e. 246 = 48*100 = 4,800.

Similarly, you can add multiple customizable options for Area or Volume based products as per your requirements.
Pricing Calculator Settings
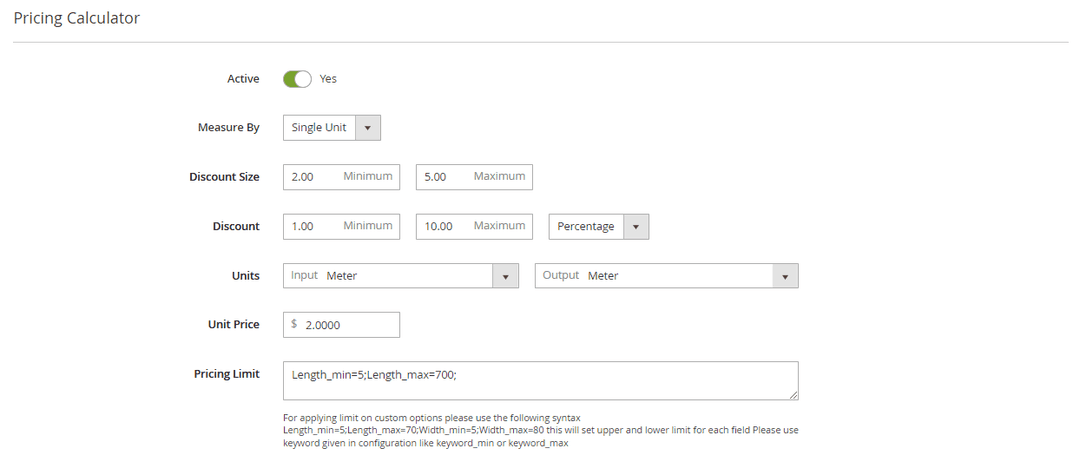
After custom options are set, scroll down and expand the “Pricing Calculator” section. Here, you can configure the following options.
Active: Option to Enable/Disable the Pricing Calculator for this Product.
Measure By: Select an option from the dropdown according to your product type. You can measure by Single Unit (same input and output units), Area, Volume, and Weight. For example, you would want Tiles to measure by Area, fruits and vegetables by Weight, and Milk by Volume. The option you select will display on the product page.
Discount Size: This represents the discount range. You can define the min and max discount size. This means that the minimum discount amount will be offered to those whose output value is greater than the minimum discount size and no further discount than the max discount amount will be given if the output value exceeds the max discount size.
Discount: This is the actual discount amount. This is also in range with min and max discount amounts and a dropdown with Fixed and Percentage options.
Example: If a merchant defines the discount size as 11-300 and the discount amount as 2-10 (2 as minimum and 10 as maximum discount amount) and selects the Fixed option then the customer will be offered $2 (minimum discount amount) discount if his output value is 11 (minimum discount size) and $10 (maximum discount amount) discount if his output value is 300 (maximum discount size). If the output value is 10 (less than the minimum discount size), no discount is offered. If the output value is 400, the discount will still be $10 (maximum discount amount).
Output value means total Area, total Weight or total Volume. Suppose a customer specifies the length and width as 6 and 4 respectively, his total area is 24.
Units: The values of these dropdowns are dynamic which change according to the option you select in the ‘Measure By’ dropdown above. For example, if you have selected ‘Area’, these fields will be dynamically populated with the relevant units such as:
- Meter
- Centimeter
- Foot
- Inch
- Millimeter
- Kilometer
- Mile
- Yard
- Acre
- Kilogram
Unit Price: Enter the per unit price of the item which will be multiplied with the input units to calculate the total price.
Pricing Limit: Option to apply limits on custom options. This will apply upper and lower limits for each field. Keywords specified in the configuration should be used. In Basic configurations above, we have specified min as keyword for minimum quantity and max as keyword for maximum quantity so we can use Length_min, Length_max to specify the lower and upper limit for length.

When you are done with configurations, click Save Config on the top right.
Refresh Cache
Refresh the Cache: System > Cache Management > Select All from Mass Actions > Click Refresh the Cache.