User Guide of Magento 2 Order Import Export Extension
General Configurations
At the backend, go to FME EXTENSIONS > Configurations. Here you can find the extension configurations.
Cron Settings for Export
- Enable: Option to enable or disable the cron settings for export
- Frequency: Specify the frequency of cron i.e. how often the cron job will run
- Start Time: Specify the time when cron will occur

Cron Settings for Import
- Enable: Option to enable or disable the cron settings for import
- Frequency: Specify the frequency of cron
- Start Time: Specify the time when cron will occur

How to Add Export Order Profile?
At the back end, go to SALES > Export Orders. Here you can find the grid of all your export order profiles. Click on the Add New Profile to add a new profile or Edit button to edit an already added profile.

Provide the following information.
Profile Information
- Automatic Execution: Enable/Disable the Cron for any specific profile
- Name: Provide name for the export profile (back end use only)
- Exclude Child Products: Options to skip child products on export
- Exclude Parent Products: Options to skip parent products on export

- Change Status To: Exported orders will get specified status after export. The status of the order will be updated only in the exported CSV / XML file, not in the database.

- Store View: Specify the store view on which it will be applied

- Allow Order Filters: Specify the order number filters from the following
If you select ‘Order Number,’ you must provide a specific order number. In the case of ‘Order Total Filter,’ you need to provide the order grand total. If you select ‘Starting From and Ending With Filter,’ you must provide the following two fields:
- Starting From #: Enter the order number to start the export from, e.g., 100000040. Leave empty to ignore.
- Ending With #: Enter the order number to end the export with. Leave empty to ignore.

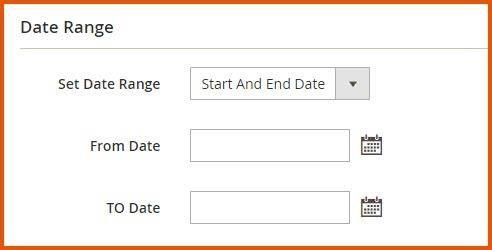
Date Range
This section allows you to export orders of a specific time period.
- Set Date Range: Option to specify the date range for export.
If you select ‘Specific Date’, you have to provide a specific date. In the case of ‘Start And End Date’, you have to provide the following two fields:
- From Date: Enter a start date
- To Date: Enter an ending date

- Export by Customer Groups: Select ‘Yes’ or ‘No’ to filter order export file by customer groups
- For Customer Group: Select one or more customer groups

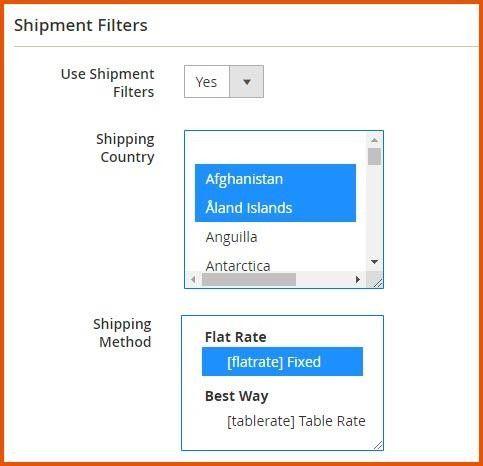
Shipment Filters
This section allows you to apply shipping filters on order export.
- Use Shipment Filters: Select ‘Yes’ or ‘No’ to use shipment filters for the Profile
- Shipping Country: Select the shipping country
- Shipping Method: Select the shipping method

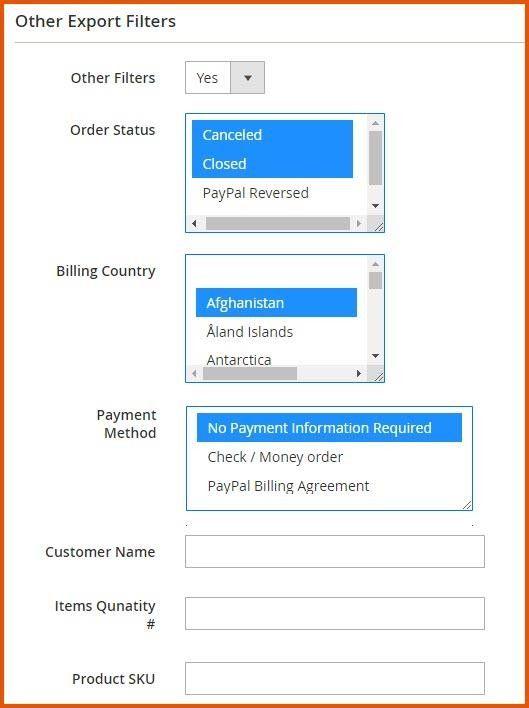
- Other Filters: Select ‘Yes’ or ‘No’ to enable additional filters for the profile if available in your store.
- Order Status: Select the order status to filter orders for export
- Billing Country: Choose the billing country to filter orders
- Payment Method: Select the payment method for filtering orders
- Customer Name: Enter the customer's name for filtering orders
- Items Quantity #: Specify the number of items in the order
- Product SKU: Enter the product SKU. For multiple SKUs, separate them with commas.

File Properties
- File Name: Only file name required with no extension. Both will be used for the saved file and the one upload via FTP. (Note: Please don't use "_" in the file name e.g. order_information).
- File URL: Provide a URL path for the rule to use. Example: "/orderexport/" or "/" for the base path (path must be writeable)

Data Format
-
File Format: Specify the export file data format
-
Order Items Delimiter: If the order has multiple items, then this field works as a separator between items e.g. @, / etc.

FTP/SFTP Configuration
- Upload Exported File By FTP: Select ‘Yes’ or ‘No’ to upload the exported file by FTP
- Protocol: Select the protocol to upload the exported file
- Host Name: Enter the host name. It can be an IP address or host name.
You can add port at the end of host name e.g. ftp.domain.com:22
- User Name: Enter the user name
- Password: Enter the password
- Directory Path: Enter the directory path. Full path of a directory e.g. /var/www/path/to/your-folder/

Email Settings
- Send Exported File via Email: Select ‘Yes’ or ‘No’ to send the exported file via email
- E-mail From: Select the sender of the email
- E-mail Address: Enter the email address
- E-mail Message Subject: Enter the subject of the email message
- Compress Exported File in ZIP: Select ‘Yes’ or ‘No’ to compress the exported file in zip

- Export Fields: Options to export all fields or only specific fields

Run History
Here, you can view all run history by clicking on Generate for the rule, as highlighted.

How to Add Import Order Profile?
At the back end, go to SALES > Import Orders. Here you can find the grid of all your import order profiles. Click on the Edit button or click on the New Import Profile button to continue.

Now here you have to provide the following information.
General Information
- Create Customers Based on Billing/Shipping Address: Select ‘Yes’ or ‘No’ to create customers based on billing/shipping address
- Automatic Execution: Select ‘Yes’ or ‘No’ to enable/disable the automatic execution
- Cron Number of Order to be Imported in Single Interval: If the field left blank, then the module will take default value of 50. If you enter 0, the module will consider all data to import.
- File Format: Specify the import file data format
- Import Mode: Specify the import mode
- Merge Existing Data (if you want to update the existing database)
- Replace Existing Data (Match Order/Entity Id with the existing database. Delete the previous Id, replace it with the new one)
If you select ‘Replace Existing Data’, then following field will appear:
- Delete Order Even If It’s Invoiced: Select ‘Yes’ or ‘No’ to delete the order even if it invoiced. If you select ‘No’ here, then again, a new field will appear
Note: Its invoices/credit memos/shipments will also be deleted
- What If Any Item is Already Invoiced: In this case, there are two options:

- Show Progress Message: Select ‘Yes’ or ‘No’ Show/Hide the progress message while importing the file. It shows Success and Failed orders during the import process. Moreover, this module will also generate error log file at the following path: /var/log/

-
Recalculate Items Incorrect Total: Select ‘Yes’ or ‘No’ to recalculate the incorrect total for items.
-
Order Items Delimiter: If the order contains multiple items, this field defines the separator between them (e.g., @, /, etc.).
-
File Type: Choose the type of file for import:
- Sample File: If you export any order file from your own module, it is considered a sample file. For this file, the "Export All Fields Data" option will be used.
- Custom File: Any file other than a sample file is treated as a custom file. If importing a custom file, it must include all the mandatory columns of the default Magento database. You need to map all the columns of your custom file to the corresponding mandatory columns. Each column should be mapped only once. For example, if there is a column named ‘entity id’ in the default Magento database and ‘id’ in your custom file, you must map ‘id’ to ‘entity id,’ and so on.
-
Attachment: Upload the file


You can also upload any custom image for your order CSV/XML files. Just go to the following path and paste a PNG image with the same name as written below.
- XML => pub/media/orderimport/default/icon-xml.png
- CSV => pub/media/orderimport/default/icon-csv.png
