User Guide of Magento 2 Hide Price Extension
General Settings
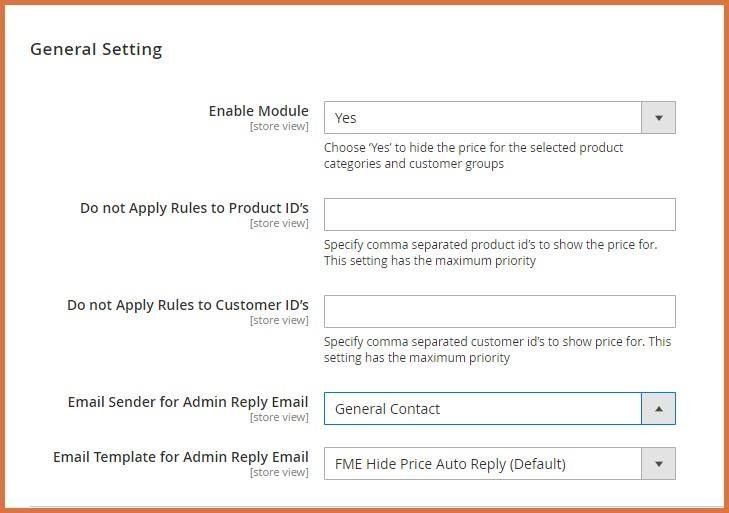
On the admin panel sidebar, go to FME EXTENSIONS -> Configurations. Here you will find the following settings:
- Enable Module: Option to enable or disable the module
(Hint: Choose 'Yes' to hide the price for the selected product categories and customer groups).
- Do not Apply Rules to Product IDs: Option to specify the products for which to show prices. You can enter product IDs separated by commas (e.g., 2, 7, 8).
(Hint: This setting has the highest priority.)
- Do not Apply Rules to Customer IDs: Option to specify customer IDs to show price for. You can write comma-separated customer IDs
(Hint: This setting has the maximum priority)
-
Email Sender for Admin Reply Email: Option to choose the email sender for the admin reply email:
- General Contact
- Sales Representative
- Customer Support
- Custom Email 1
- Custom Email 2
Email Template for Admin Reply Email: Option to choose the email template for admin reply email
Hide Price Form Design
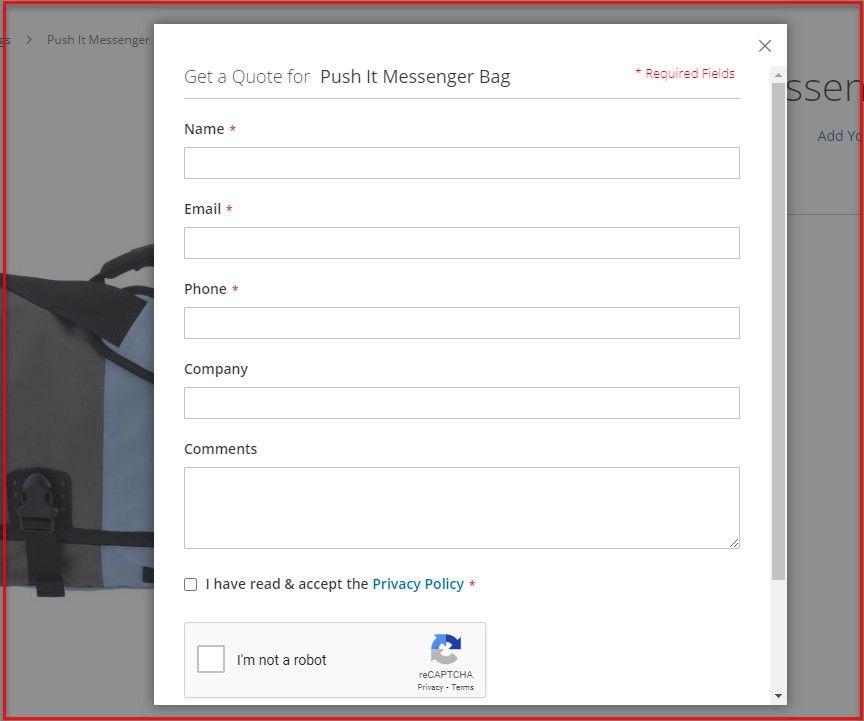
When clicked, this form will appear in a pop-up when you choose to replace the price or the 'Add to Cart' button with a quote form.
- Label: Option to set the label of the hide price form fields
- Type: Option to set the type of the hide price form fields
- Text Field
- Text Area
- Checkbox
- Order: Option to define the order of the form fields (sorting order)
- Required: Option to decide the requirement of the form fields. Either it is necessary OR not
- Enable: Option to Enable / Disable the form fields
- Action: Option to delete the form fields
- Add: Option to add a new form field

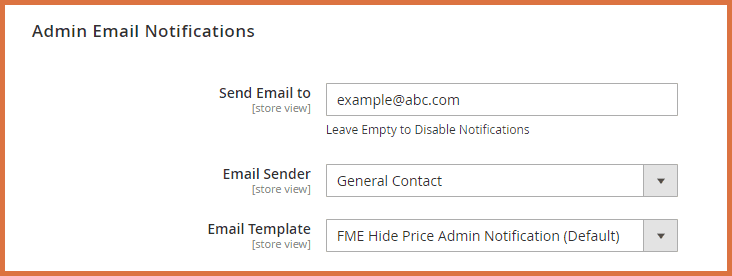
Admin Email Notifications
- Send Email to: Option to set email for receiving notifications
- Email Sender: Option to choose email sender:
- General Contact
- Sales Representative
- Customer Support
- Custom Email 1
- Custom Email 2
- Email Template: Option to choose a template for sending the email
Auto Reply Email Options
- Enable: Option to Enable / Disable auto-reply email option
- Email Sender: Option to choose email sender:
- Email Template: Option to choose a template for sending the email

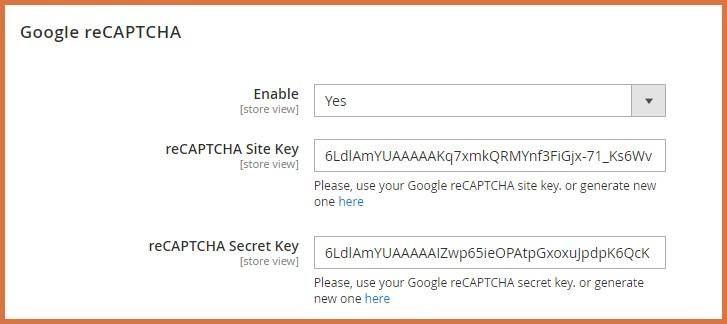
Google reCAPTCHA
- Enable: Option to Enable / Disable reCAPTCHA
- reCAPTCHA Site Key: Option to write reCAPTCHA key. You can use your Google reCAPTCHA site OR you can generate it from https://www.google.com/recaptcha/admin
- reCAPTCHA Secret Key: Option to write secret reCAPTCHA key. You can use your Google reCAPTCHA site OR you can generate it from https://www.google.com/recaptcha/admin
GDPR Consent
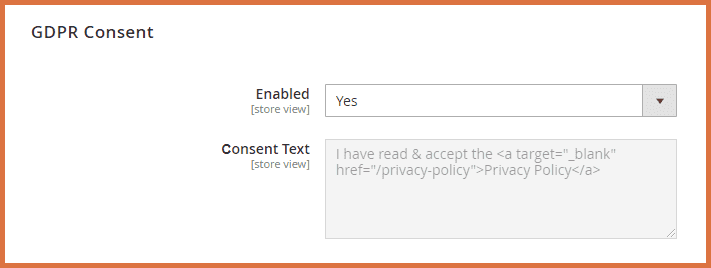
You can add terms and conditions checkbox to your quote form.
- Enabled: Option to Enable / Disable GDPR consent:
- Consent Text: Option to write the text for the GDPR consent
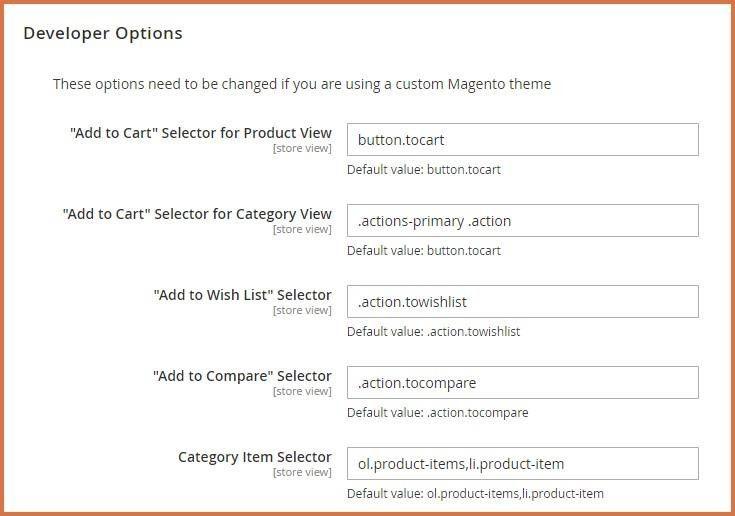
Developer Options
Note: These options need to be changed if you are using a custom Magento theme. Here, you can specify the following:
- “Add to Cart” Selector for Product View
- “Add to Cart” Selector for Category View
- “Add to Wish List” Selector
- “Add to Compare” Selector
- Category Item Selector
How To Manage Hide Price Rules?
At the backend, go to FME EXTENSIONS > MANAGE RULES. Here, you can find the list of rules and add new ones by clicking the ADD RULE button located at the top right. After clicking the button, a form will appear where you need to provide information about the rule. In the first tab named Rule Information, you must provide the following details:

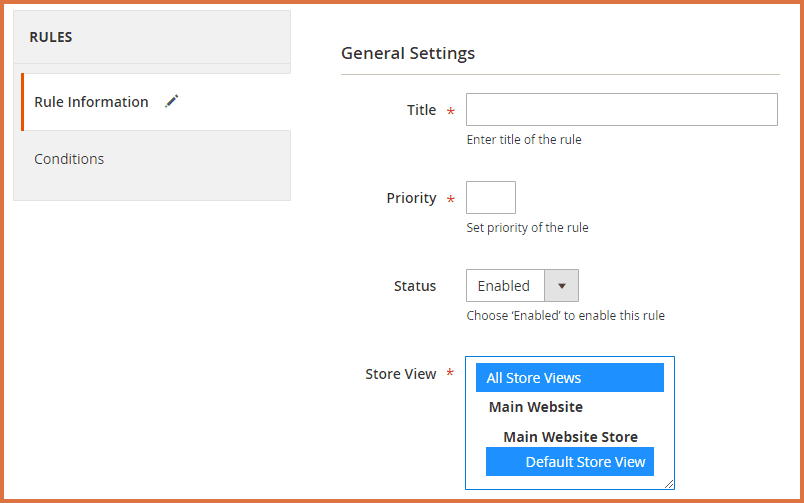
Rule Information >General Settings
- Title: Option to set the title of the rule
- Priority: Option to set the priority of the rule
- Status: Option to enable/disable the rule
- Store View: Select the store views on which this rule will be applied to
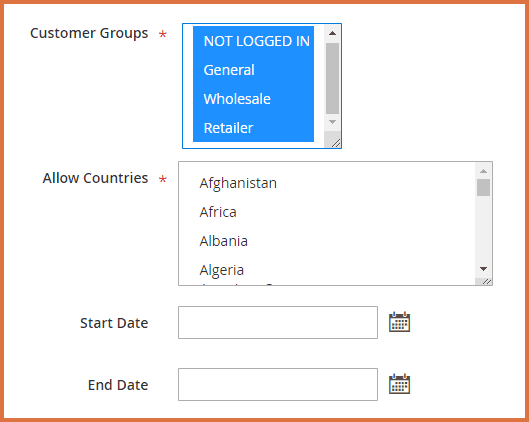
- Customer Groups: Select the customer groups on which this rule will be applied on (Note: Product price will be hidden for the selected customer groups only)
- Allow Countries: Option to choose countries to enable/disable the rule on them. You can choose from list of all the countries
(Note: To Allow Selected Countries, first go to FME EXTENSIONS -> Import Countries List -> Import Database)
- Start Date: Option to set the start date of the rules’ implication
- End date: Option to set the end date of the rules’ implication
Rule Information > Hide Price Options
- Hide Price: Option to hide price
- Hide “Add to Cart”: Option to hide add to cart button OR replace it with some custom button like, “Get a Quote”, “Sign Up” etc.
- Hide “Add to Wishlist”: Option to hide wish-list link when the price is hidden
- Hide “Add to Compare”: Option to hide compare list when the price is hidden

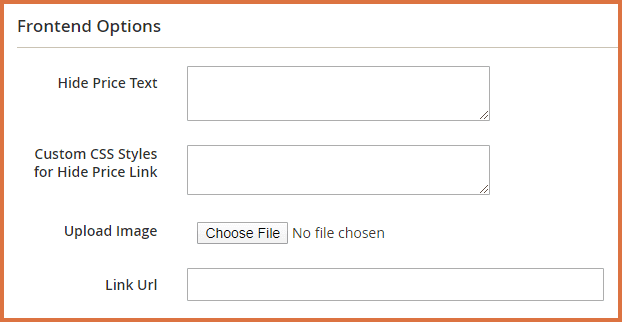
Rule Information > Frontend Options
- Hide Price Text: Option to write the text to display when the price is hidden, i.e. “Call for
- Price”
- Custom CSS Styles for Hide Price Link: Option to customize the CSS style for the Hide Price Link
- Upload Image: Option to upload the image to show it instead of price
- Link URL: Option to insert page URL to redirect customers to any page you need (Note: Use text ‘FMEHidePricePopup’ for opening Ajax Popup with a ‘Get a Quote’ form)
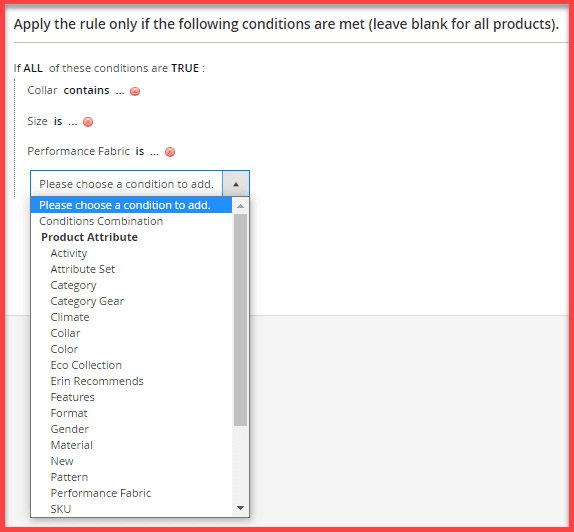
Rule Information > Conditions
Unless the following conditions are met, don't apply the rule (leave all boxes blank).
How To Manage Get A Quote Requests?
At the backend go to FME EXTENSIONS > GET A QUOTE REQUEST, and you will see all the requests made by the customers.

You can reply to the requests of the clients by writing your message into the Email Text box.

How To Import Countries List?
At the back end, go to FME EXTENSIONS > IMPORT COUNTRIES LIST. From here you can import the list of countries.

Store Frontend
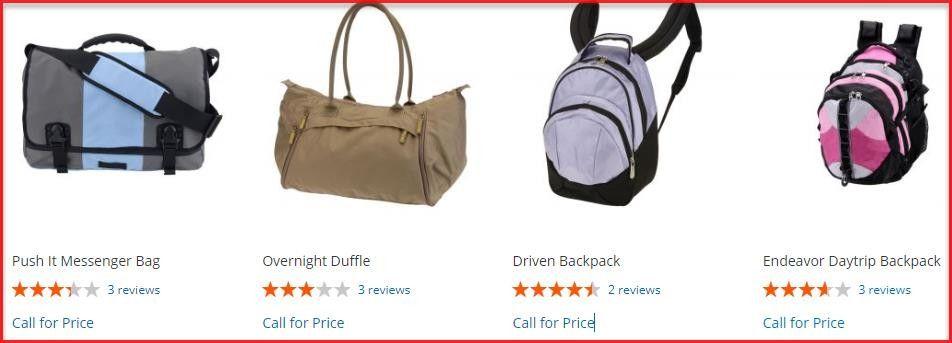
Hide Price - Category Page
Prices are hidden and replaced by ‘Call for Price’ quote form in the relevant category.
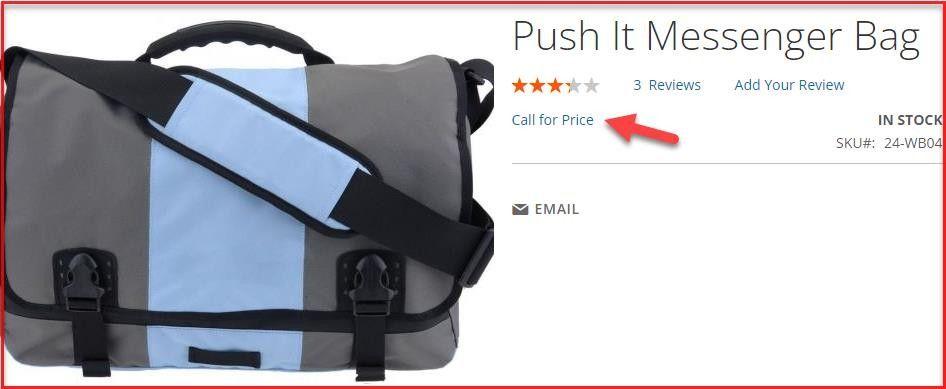
Hide Price - Product Page
Price is hidden and replaced by ‘Call for Price’ quote form on the product page.
When customers click that button, a pop-up form window appears. After filling out the pop-up form and submitting it, customers will receive an email containing the product price at the address provided in the form.
GraphQL APIs
1. Product Query
Query
{
 products(search: "bag", pageSize: 2) {
   items {
     id
     name
     sku
     fme_hide_price_content {
       hide_price_status
       hide_price_text
       hideprice_url
       hide_add_to_cart_status
       hideprice_cart_title
       hideprice_cart_image
       hideprice_cart_link
       is_wishlist_active
       is_compare_active
     }
   }
 }
}
Response
{
   "data": {
       "products": {
           "items": [
               {
                   "id": 8,
                   "name": "Voyage Yoga Bag",
                   "sku": "24-WB01",
                   "fme_hide_price_content": {
                       "hide_price_status": false,
                       "hide_price_text": null,
                       "hideprice_url": null,
                       "hide_add_to_cart_status": false,
                       "hideprice_cart_title": null,
                       "hideprice_cart_image": null,
                       "hideprice_cart_link": null,
                       "is_wishlist_active": false,
                       "is_compare_active": false
                   }
               },
               {
                   "id": 1,
                   "name": "Joust Duffle Bag",
                   "sku": "24-MB01",
                   "fme_hide_price": {
                       "minimum_price": {
                           "regular_price": {
                               "value": null,
                               "currency": null
                           },
                           "final_price": {
                               "value": null,
                               "currency": null
                           }
                       }
                   },
                   "fme_hide_price_content": {
                       "hide_price_status": true,
                       "hide_price_text": "Call for Price",
                       "hideprice_url": "FMEHidePricePopup",
                       "hide_add_to_cart_status": true,
                       "hideprice_cart_title": "Testing",
                       "hideprice_cart_image": "http://m247/media/fme/hideprice/images/3/0/300x300.png",
                       "hideprice_cart_link": "FMEHidePricePopup",
                       "is_wishlist_active": false,
                       "is_compare_active": false
                   }
               }
           ]
       }
   }
}
2. Get Hide Price Form Fields
Query
query {
   fme_hide_price_form {
   hidePriceForm {
       name
       label
       type_html
       type
       required
       enable
   }
   gdpr_consent {
       status
       content
   }
   recaptcha {
       status
   }
   }
}
Response
{
   "data": {
       "fme_hide_price_form": {
           "hidePriceForm": [
               {
                   "name": "additional__1735561744249_249",
                   "label": "Phone Number",
                   "type_html": "text",
                   "type": "1",
                   "required": true,
                   "enable": true
               },
               {
                   "name": "additional__1735562564579_579",
                   "label": "Inquiry Details",
                   "type_html": "text",
                   "type": "1",
                   "required": true,
                   "enable": false
               },
               {
                   "name": "additional__1735562565482_482",
                   "label": "Required QTY",
                   "type_html": "text",
                   "type": "1",
                   "required": true,
                   "enable": true
               },
               {
                   "name": "checkbox__1735562566328_328",
                   "label": "Country",
                   "type_html": "checkbox",
                   "type": "3",
                   "required": true,
                   "enable": true
               }
           ],
           "gdpr_consent": {
               "status": true,
               "content": "I have read & accept the <a target=\"_blank\" href=\"/privacy-policy\">Privacy Policy</a>"
           },
           "recaptcha": {
               "status": true
           }
       }
   }
}
3. Submit Form
Mutation
mutation {
 hidepriceFormSubmit(input: {
   customer_name: "hassan shah",
   customer_email: "hassan.zamir@unitedsol.net",
   product_id: "3",
   additional_fields: [
       {name:"additional__1735561744249_249",value:"hek"},
       {name:"additional__1735562564579_579",value:"hek"},
       {name:"additional__1735562565482_482",value:"hek"},
       {name:"checkbox__1735562566328_328",value:"0"}
   ]
 }) {
   message
 }
}
Response
{
   "data": {
       "hidepriceFormSubmit": {
           "message": "Thanks for contacting us. We'll respond to you as soon as possible."
       }
   }
}