User Guide of Magento 2 Contact Form Extension
General Configurations
At the backend, go to FME EXTENSIONS > Configurations. Here you can find the extension configurations.
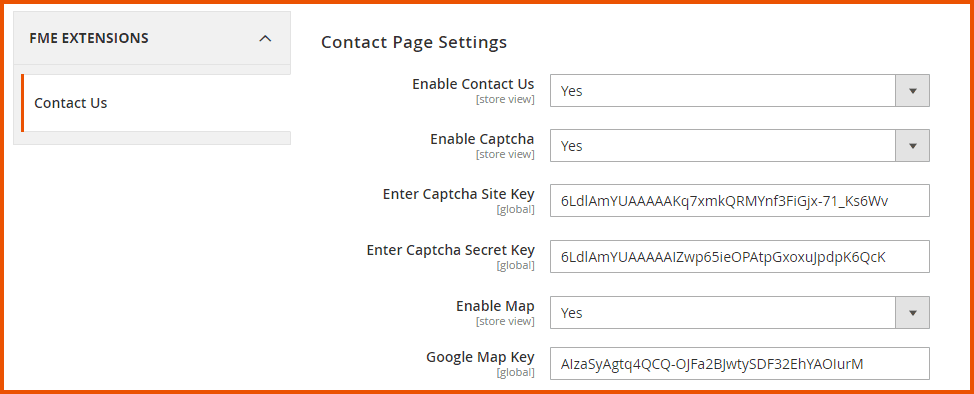
Contact Page Settings
- Enable Contact Us: Option to Enable / Disable Contact us form
- Enable Captcha: Option to Enable / Disable Google Captcha
- Enter Captcha Site Key: Option to set Google Captcha site key
Note: Get Key From https://www.google.com/recaptcha/admin
- Enter Captcha Secret Key: Option to set Google Captcha secret key
- Enable Map: Option to Enable / Disable map. This Map will show on contact us page
- Google Map Key: Option to set Google Captcha map key
Note: Get Key From https://developers.google.com/maps/documentation/javascript/get-api-key)
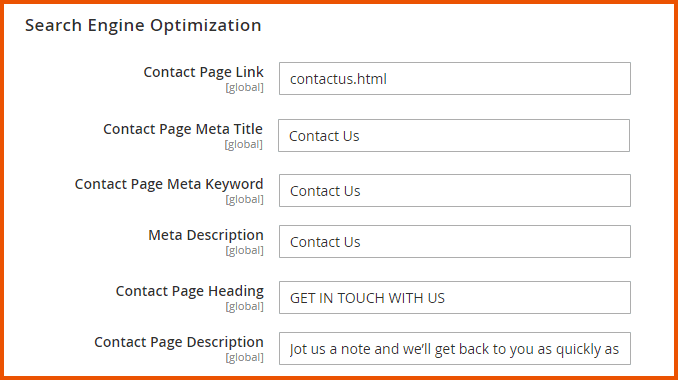
Search Engine Optimization
- Contact Page Link: This text is an identifier.
Note: Use text other than 'contact'
- Contact Page Meta Title: Option to provide meta title for the contact us page
- Contact Page Meta Keyword: Option to write keywords for contact page
- Meta Description: Option to write a meta description for contact page
- Contact Page Heading: Option to write the heading of the contact page. This text will display on the frontend.
- Contact Page Description: Option to write a description of the contact page. This text will display on the frontend.
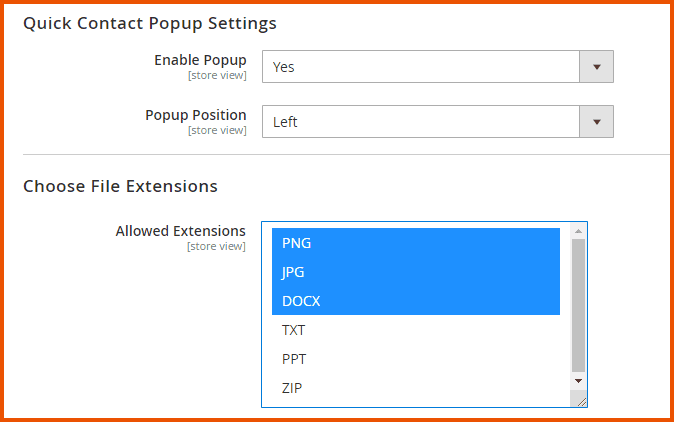
Quick Contact Popup Settings
- Enable Popup: Option to Enable / Disable the pop-up
- Popup Position: Option to set popup position.
Choose File Extensions
- Allowed Extensions: Select the extensions here
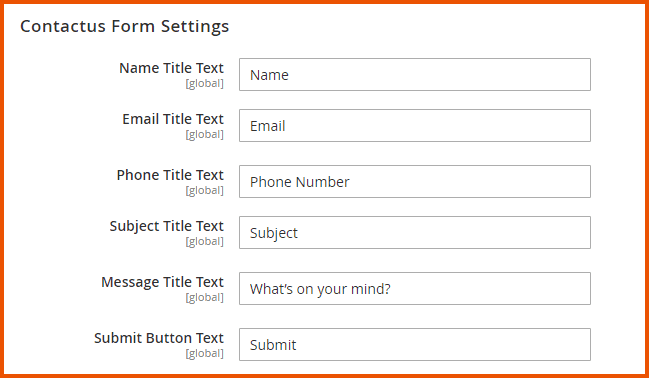
Contact Us Form Settings
- Name Title Text: Option to set text for the name field. This text will display on the frontend.
- Email Title Text: Option to set text for the email field
- Phone Title Text: Option to set text for the phone field (Note: If this field is empty then it is disabled on frontend)
- Subject Title Text: Option to set text for the subject field, if this field is empty then it is disabled on the frontend
- Message Title Text: Option to set text for the message field
- Submit Button Text: Option to set for submit button
Email Options
- Send Emails To: Option to set email where all contact us queries will be sent.
- Email Sender: Option to set email-sender title i.e. General Contact, Customer Representative, etc.
- Email Template: Option to choose an email template based on theme fallback when the "Default" option is selected

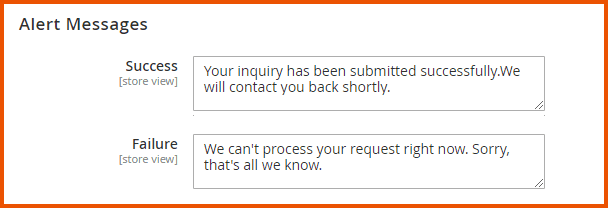
Alert Messages
- Success: This success message will be displayed after submitting contact us form successfully
- Failure: This failure message will be displayed after submitting contact us form un- successfully
After setting the configurations, click on the Save Config button at the right top to save them.
How to Add Form Fields?
Now at the backend go to FME EXTENSIONS > Manage Fields, you will see there a list of fields and a button Add New Fields to add new ones.
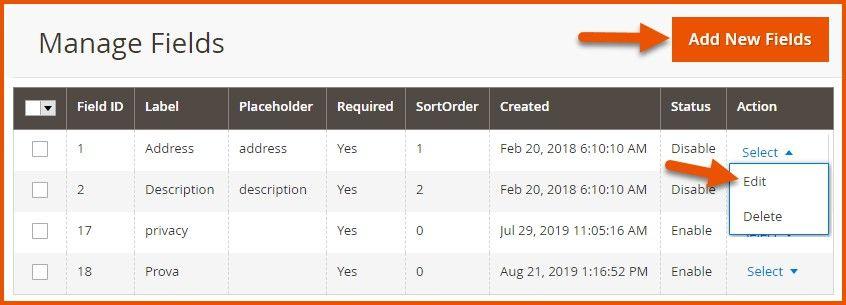
After clicking the Add New Fields button, a form will appear where you will have to choose the type of field which you want to include and set its properties as well.
Add New Fields
Here you will see several field types like textbox, text area, dropdown, checkbox, radio button, upload file, multi-select, date. To add any of the field types in the form, click on that particular field and a button will appear named Add New. After clicking the button properties of the field will appear on the screen and you will have to set the properties like:

- Enter Label: Option to provide the label of the field to appear in the form
- All Store views: Option to select the store views on which field shall be visible
- Enter placeholder: Option to set the place holder of the field
- Required: Option to set the field as required OR not. By marking it as required, it will be mandatory for the user to answer the field
- Field Type: Option to set the field type as:
- Text
- Number
- Enter Sort Order: Option to set the sort order of the field in the contact form
- Remove: A button to remove the field, if you want to remove it
Now the process of adding any of the fields and setting its properties is the same. Whichever field you want to include in the form just click on it, set its properties and lastly click on the SAVE button at the right top to save all the fields of the form.
How to Manage Submissions?
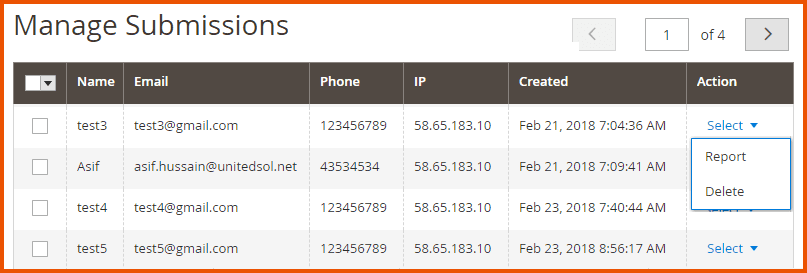
Now at the backend go to FME EXTENSIONS > Manage Submissions. Here you will get all the information provided by your customers. You can always Delete or Report this information as per your requirement.
Frontend
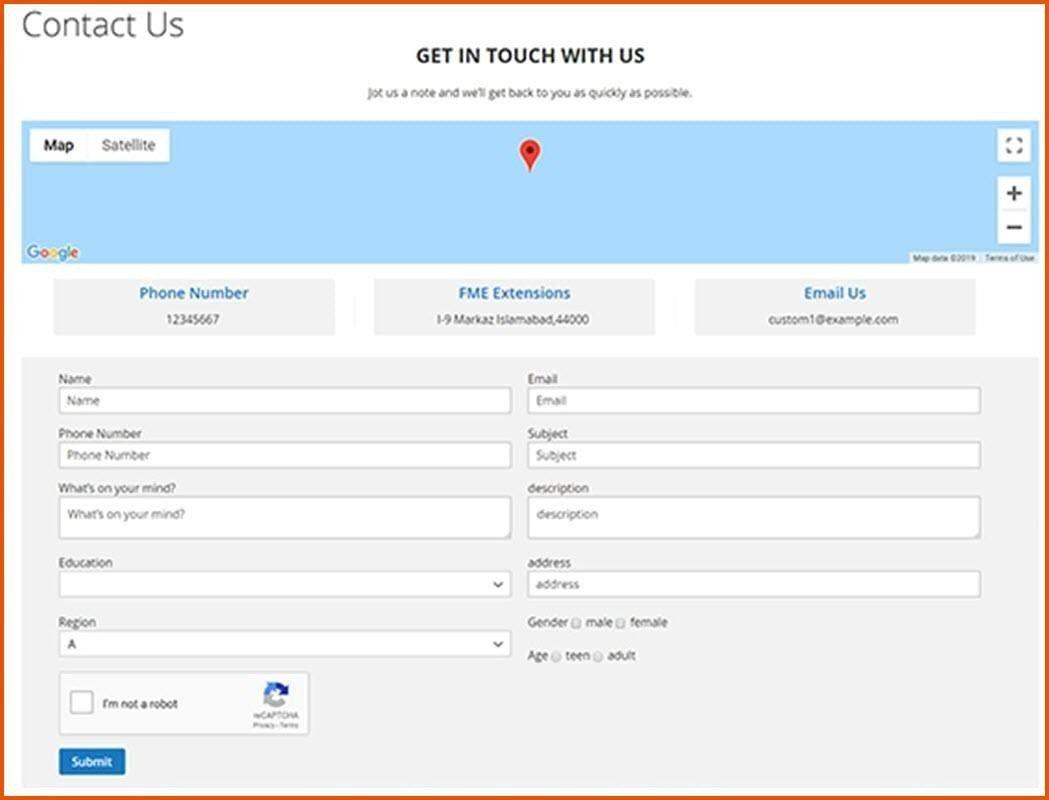
Contact Form Popup

Responsive Contact Us Page
GraphQL APIs
1. Retrieve Details of All Custom Form Fields
Query
{
   get_form_fields {
       field_id
       label
       placeholder
       value
       required
       field_type
       sort_order
       validation
       file_size
       file_type
       status
       store_id
       field_options {
           option_id
           option_value
       }
   }
}
2. Submit All Form Fields
Mutation
mutation {
submit_dynamic_form(input: {
form_id: "xj92@tp",
ip: "192.168.1.1",
country: "USA",
name: "John Doe",
email: "john@example.com",
phone: "+1234567890",
subject: "Test Subject",
message: "Hello, this is a test message.",
field_data: [
{ field_label: "Age1", field_type: "radio_field", field_value: "25"},
{ field_label: "Zip_Code4", field_type: "input_field", field_value: "12345" }
{ field_label: "Upload_File3", file_name: "abc.jpg", field_type: "upload_field", field_value:
"Base64 encoded code" }
]
}) {
success
message
}
}