How to Add a Comment Field to Checkout Page in Magento 2?
As a leading Magento extensions company, we have first-hand knowledge of the issues facing online stores. Right now, the concern on every store owner mind is to improve the customer experience. One may think that increasing the marketing budget, cutting prices, or improving product quality are the top solutions to this problem, but that’s not the case.
Based on our experience, a few tweaks to the checkout page can get the job done. After all, the checkout phase is the most important part in eCommerce. It determines whether the user will complete the purchase. By enhancing the user experience at this stage, store owners can effectively address the high levels of cart abandonment and improve their store’s sales performance.
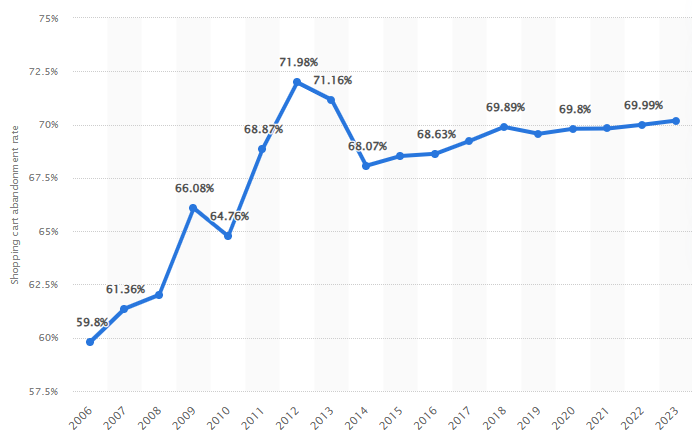
Source: Statista
The above image shows the global cart abandonment rate. As you can see, it is quite high. Depending on your location, the rate might be even higher.
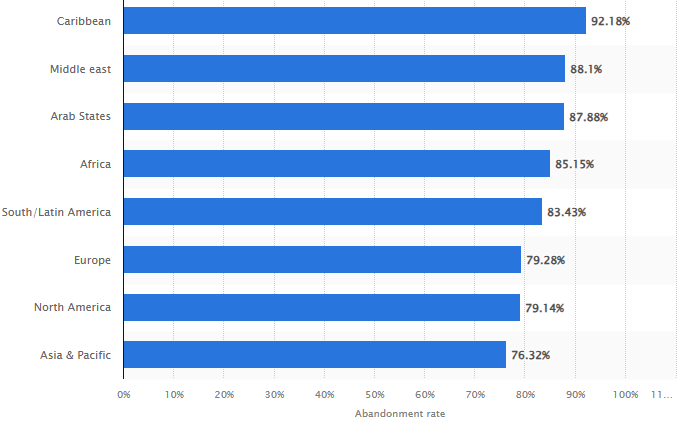
Source: Statista
The above image shows the cart abandonment rate by region. If you are still not convinced about the checkout stage’s importance, look at the below statistic.
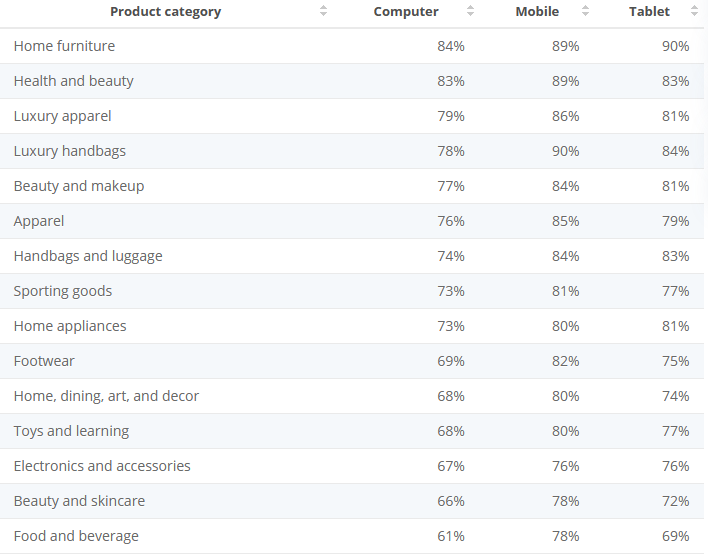
Source: Statista
The above image shows the cart abandonment rate by product category and device type. Therefore, there’s no doubt that this stage is where you need to focus your resources on. We suggest customising the checkout fields to reflect the target audience’s preferences and to differentiate yourself from the competitors. Remember, the idea is to make the checkout stage as comprehensive as possible.
Read More:Why Checkout Holds The Key To Success In Digital CommerceMagento 2 Add Comment Field to Checkout
While the default Magento 2 checkout fields such as email address, first & last name, shipping address, phone number, shipping method, etc. are enough to fulfil an order, it’s a good idea to add additional fields to better understand your customers. For example, adding a comment field will allow customers to add any specific details to their order for sellers to take into account while fulfilling the order.
Similarly, by adding a “how did you find us” multi options field, you know how every customer reaches your store. This information can prove highly beneficial in enhancing your marketing strategies. Unfortunately, Magento 2 does not allow adding custom fields to the checkout page. Merchants have 2 options to do this. Either write a complex code or use a 3rd party extension.
The former option is cost effective but time consuming and difficult with fair chances of errors. The latter one is expensive but reliable and quick. Talking about 3rd party extensions to do the work, our Magento 2 Order Attributes extension offers more value for less money. It allows 12 types of different fields to collect any information merchants need.
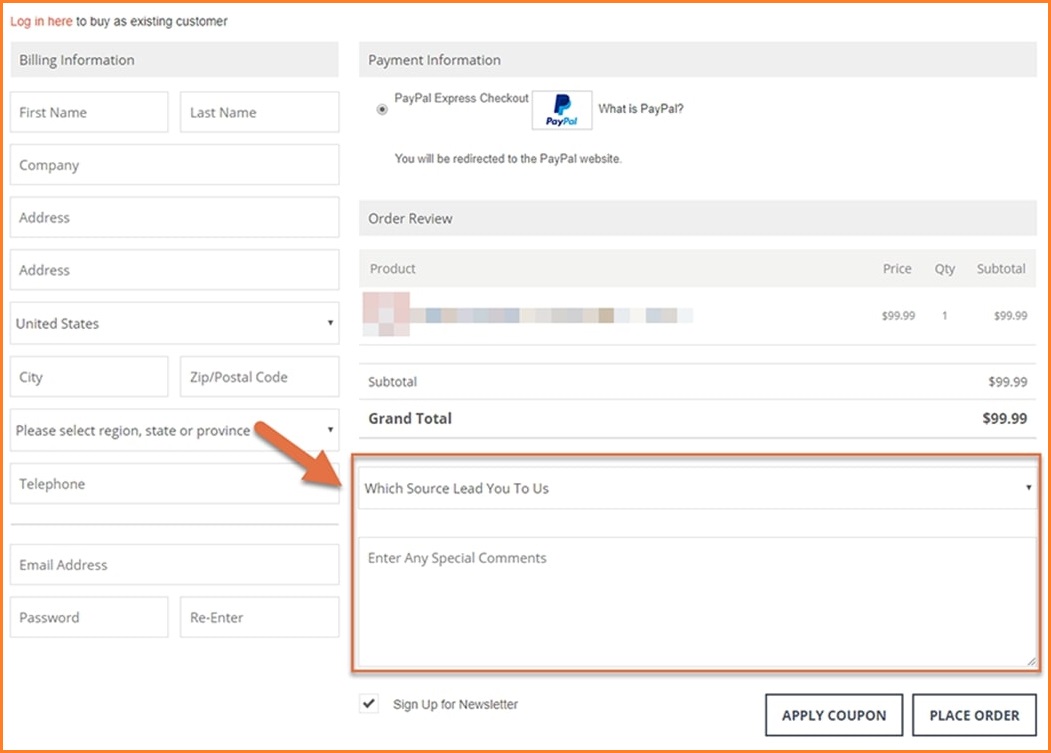
Most importantly, they can add a custom field to any checkout step i.e. billing address, shipping address, shipping method or review & payments. This goes a long way in personalising the checkout stage and helping merchants get the information they need to improve store performance. In the example below, we have added a comment field to the checkout page using the extension.
Steps To Add Comment Field in Magento 2 Checkout Page
After you have installed the extension, follow the steps below.- On the left sidebar, click FME Extensions -> Manage Fields.
- Click Add New Attribute.
Now fill in the following fields.
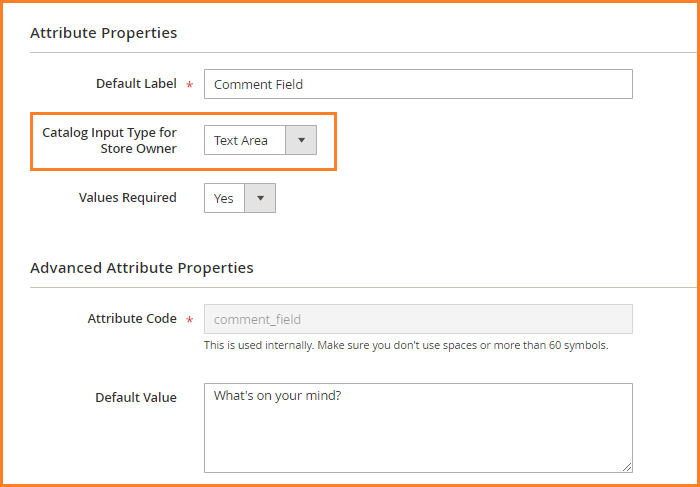
- Default Label: Enter the label that you want to give to the custom field. For example, ‘Comments’.
- Catalog Input Type for Store Owner: Select the input type for the custom field. In this example, we can select Text Area.
- Values Required: Select “No” to make the field optional and “Yes” to make it mandatory.
- Attribute Code: This code is used for internal reference only. Give it any name according to your ease. For example, ‘custom_comment_field’.
- Default Value: Enter the text that you want to pre-populate the custom field with. Leaving it empty will display the custom field with no text.
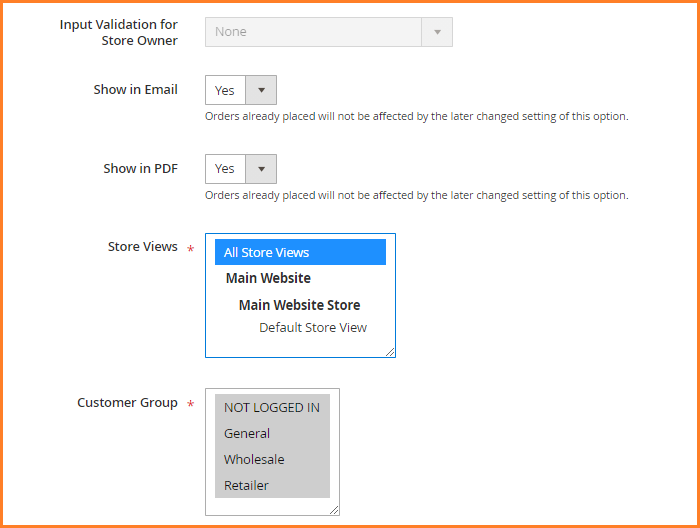
- Input Validation for Store Owner: Choose if you want to validate the field input. For example, if you want users to enter letters only with no numbers, email or URL, select “Letters”.
- Show in Email: Choose if you want the custom comment field to be displayed in email that is sent to users after the order has been placed.
- Show in PDF: Choose if you want it to be displayed in PDF.
- Store Views: Select the store view you want to limit the field to.
- Customer Group: Select the customer group you want to limit the field to.
- Categories: Select one or more categories you want to add the comment field to on the checkout page.
 You can also select specific product(s) by checking the checkbox.
Now select the Storefront Properties on the left panel and configure the following fields.
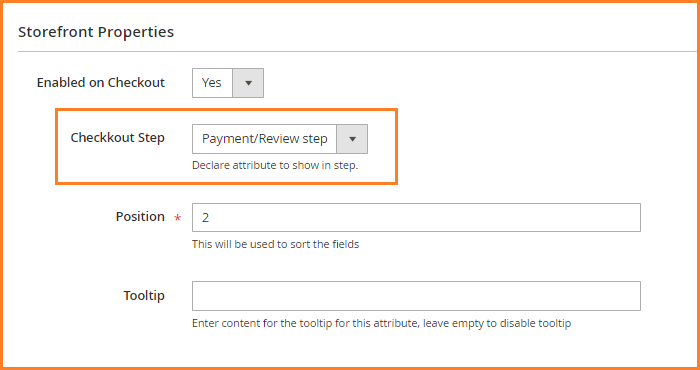
- Enabled on Checkout: Set it to ‘Yes’.
- Checkout Step: Select the checkout step that you want to add the comment field to. In this case, we will select ‘Payment/Review step’.
- Position: Enter the position for sorting purposes. 0 will display it on top.
- Tooltip: Enter the text to provide extra information about the field when the user moves the mouse over it.
- Click Save Attribute.
The comment field will be displayed on the checkout page as shown below.

The extension is also compatible with Magento one page checkout.
Conclusion
This concludes our article on how to add a comment field to checkout page in Magento 2. Feel free to contact us, if you have any issue regarding the Magento 2 checkout.
Other Extensions You Might Be Interested In:This blog was created with FME's SEO-friendly blog


